Level Editor
The level editor is fairly complicated to use when you are just starting out. You have to deal with the multiple layers of tiles, some of which scroll at different rates. You also have to deal with collision zones, water/air, and entity placement.
Layers
Click the 0 button to the left of each layer to toggle a layer between visible or invisible.
Back Water: This is the layer that is shown behind everything when you are underwater. It doesn't scroll at all. It is probably best to leave this as the default.
Back Air: This is the layer that is shown behind everything when you are in the air. It doesn't scroll at all. It is probably best to leave this as the default.
Mid Water: This is layer that scrolls at about half the speed as the dolphin moves. This gives a 'parallax' scrolling effect. It sometimes looks good to put rocks or coral on this layer.
Mid Air: Scrolls horizontally at half the rate of the dolphin and vertically at the same rate. The islands are on this layer. You should probably just leave this layer as the default.
Front 1: Drawn behind the dolphin. Usually used for doing the back part of the water.
Front 2: Drawn behind the dolphin. Usually used for doing rocks and such that should be drawn behind the dolphin.
Front 3: Drawn in front of the dolphin. Usually used for doing the primary structure of the level.
Front 4: Drawn in front of the dolphin. Usually used for doing the front part of the water.
Collision
This layer shows where the dolphin and entities will collide with walls. We don't usually have to interact directly with this layer because we turn on "Auto Collision" so that as we lay down tiles the collision is automatically added.
Substance
This layer allows us to define where the water is and where the air is. You can often leave this as the default. If you are making caves, however, you will need to define where the air is.
Entities
Used to add the dolphin and enemies into the game. Just select a type of entity and then click in the level where you want it to be. Then, if you want to edit the entities properties, choose "Select" and then click on the entity in the level. This will bring up the property dialogue which you can use to change the entities settings.
Special
Here are many of the essential features that you need when building a level.
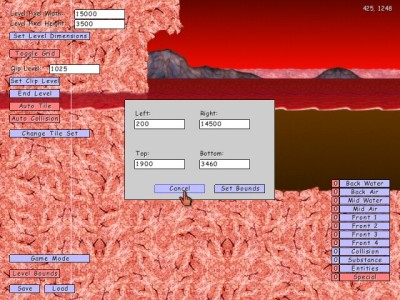
Level Pixel Width/Height is used to define the width and height of the entire level. Level Bounds is used to define where the viewable area is - so that when you get to the edge of the screen you won't see the area with no tiles on it.
Toggle Grid is used to show or not show the grid lines when editing the level.
Push the End Level button once, then click on where you want the end of the level to be. When the dolphin gets to that point the level will end (in action mode only). Click the End Level button again after you are done so that you don't accidentally reset where the end of level is.
Auto Tile automatically fills in the appropriate tiles. For example, select the rock tile that fills up the entire tile. Then draw some rock tiles. Notice that the other tiles are filled in.
Auto Collision is used to automatically place collision tiles corresponding to the tiles that you are currently placing. Make sure this is turned off if you are doing a background layer.
Change Tile Set changes what the level looks like.
Game Mode is used to select between Action, Stunt and Race modes. You can also set the points and times needed to get medals.
Save and Load allow you to save and load levels. These levels are located in the "customlevels" folder. Located in "laserdolphin/user/customlevels" on Windows and in "current user preference folder/laserdolphin/customlevels" on Mac. You can play your levels by choosing "Custom" on the game select screen. To start a new level click on Load and then Load Default.
Next: Buying the Full Version Contents